Evoshield throat guards are crucial for baseball players, especially catchers, to prevent serious injuries to the throat area from errant pitches or foul balls, offering vital protection with minimal interference to performance.
Baseball is a thrilling sport, but like any contact sport, it comes with risks. One area that needs special attention is player safety. We’ve all seen those heart-stopping moments when a ball heads towards a player’s face or throat. That’s where protective gear becomes a game-changer. For young players and even seasoned veterans, understanding and using the right gear can make a world of difference. Today, we’re zeroing in on a specific piece of equipment that’s becoming increasingly popular and for good reason: the Evoshield throat guard. You might be wondering if it’s really necessary or how it even works. We’ll break it all down, making sure you feel confident about protecting yourself or your young athlete. Stick around as we explore why an Evoshield throat guard is an essential addition to your baseball gear.
Why an Evoshield Throat Guard is a Game-Changer
The game of baseball moves fast. Pitches fly, foul balls ricochet, and sometimes, things don’t go exactly as planned. These unexpected moments can lead to injuries, some of which can be quite serious. The throat area, being particularly vulnerable, is often a point of concern. This is where a well-designed piece of protective equipment like the Evoshield throat guard steps in. It’s not just another piece of plastic; it’s a scientifically engineered shield designed to absorb and dissipate the force of impact, protecting a critical part of the body. For catchers, in particular, who are constantly positioned behind the plate and exposed to high-speed pitches and potential foul tips, this piece of gear is almost non-negotiable. But it’s not just for catchers; any player can benefit from the added security it offers. Let’s dive into why this seemingly simple accessory is becoming a must-have in the baseball world.
Understanding the Risks of Undetected Threats
It’s easy to think of baseball as a sport where the biggest risks involve sprained ankles or pulled muscles. However, the impact of a direct hit to the throat can be far more severe. The trachea, or windpipe, is a fragile structure. An impact here can lead to difficulty breathing, swelling, and in extreme cases, airway obstruction. This isn’t meant to scare you, but to highlight the importance of preparedness. Many leagues, especially at younger levels, are making throat protection mandatory for catchers, and even for other positions during certain situations. Understanding these risks empowers players and parents to make informed decisions about safety equipment.
Evoshield’s Commitment to Protection
Evoshield has built its reputation on providing athletes with innovative and effective protective gear. Their philosophy centers around allowing athletes to perform at their best without compromising their safety. The Evoshield throat guard is a prime example of this. They combine advanced materials with thoughtful design to create a product that offers robust protection while remaining lightweight and unobtrusive. This means players can focus on their game, knowing they have an added layer of security.
Anatomy of an Evoshield Throat Guard: What Makes It Work?
So, what exactly is an Evoshield throat guard, and how does it achieve its protective qualities? Unlike older, bulkier designs, Evoshield has engineered a sleeker, more effective solution. The magic lies in their proprietary materials and smart design.
Key Features of Evoshield Throat Guards
Impact-Absorbing Material: Evoshield uses specialized padding that is designed to spread out the force of an impact over a larger area. This significantly reduces the direct force on the delicate throat tissues.
Ergonomic Design: These guards are shaped to fit comfortably and securely around the neck, often attaching to a helmet or mask without feeling cumbersome. They are designed to move with the player, not against them.
Lightweight Construction: You won’t feel weighed down by an Evoshield throat guard. They are made with lightweight materials that ensure maximum mobility and comfort during intense game play.
Durability: Built to withstand the rigors of baseball, these guards are made from high-quality materials that can endure repeated impacts and long seasons.
The Science Behind the Shield
Evoshield’s technology, often referred to as “SmartShield,” works by molding to the player’s body and then hardening upon exposure to air. While this specific technology is more commonly associated with their body protectors, the principle of impact dispersion is key to all their protective gear. For throat guards, the focus is on creating a barrier that can absorb and distribute the energy from a direct impact, preventing it from causing injury. Think of it like this: instead of the impact hitting one small spot, the guard helps spread that force across a wider surface area, much like how a helmet protects your head.
Who Needs an Evoshield Throat Guard?
While nearly any player can benefit from enhanced protection, certain roles and age groups find Evoshield throat guards particularly essential.
Catchers: The Frontline Defenders
Catchers are at the heart of the action. They are directly in the line of fire for every pitch, and the risk of a foul tip or an errant pitch striking their throat is significantly higher. For youth catchers, this is especially critical as they are still developing and may not have the same reflexes or strength as older players to evade unexpected impacts. Many youth leagues now mandate throat protection for catchers, and for good reason.
Other Players on the Field
While catchers are the primary users, an Evoshield throat guard can also be a wise choice for:
Pitchers: Especially during drills or in situations where they might field a batted ball coming back at them.
Infielders: While less exposed than catchers, infielders can still be at risk from hard-hit ground balls or line drives.
Base Runners: In very rare instances, a thrown ball directed at a runner’s head or throat could occur.
Youth Players: Building Safe Habits Early
For young athletes just starting in baseball, establishing good safety habits is as important as learning to hit or pitch. Introducing an Evoshield throat guard early on instills a sense of security and reinforces the importance of protective gear. It allows them to play with more confidence, knowing they have an extra layer of defense.
Choosing the Right Evoshield Throat Guard for You
Evoshield offers a few different options when it comes to throat protection. Understanding these differences will help you make the best choice for your needs.
Types of Evoshield Throat Guards
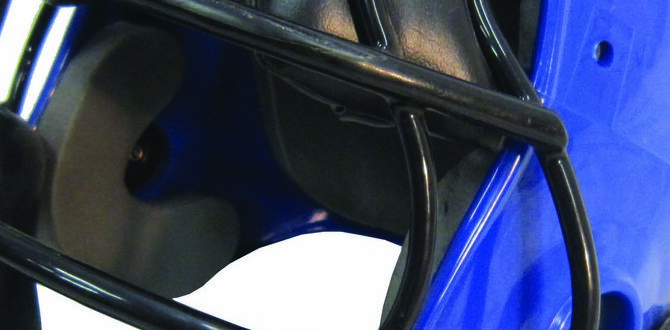
Helmet-Mounted Guards: These are designed to attach directly to the mask of a baseball helmet. They offer excellent coverage and are often preferred by catchers. They typically secure with straps or clips.
Standalone Guards: Some throat guards are designed to be worn independently and can be secured around the neck. These might be an option for players who don’t typically wear a full catcher’s mask but want added protection.
Integrated Systems: Be aware that some higher-end masks may come with integrated throat protection, though aftermarket guards are also widely available and customizable.
Factors to Consider When Buying
When you’re looking to purchase an Evoshield throat guard, keep these points in mind:
1. Compatibility: Ensure the guard you choose is compatible with your existing helmet or mask. Check the attachment mechanisms and dimensions.
2. Comfort and Fit: The guard should be comfortable to wear for extended periods and should not restrict your ability to move your head. A proper fit is crucial for both effectiveness and comfort.
3. Level of Protection: While all Evoshield guards offer good protection, some might offer slightly more coverage or utilize different padding densities. Review the product descriptions to understand the specific benefits.
4. Material: Evoshield is known for its quality materials. Look for guards made with durable, impact-resistant plastics and comfortable padding.
5. Ease of Use: How simple is it to attach and detach from your helmet? For younger players, this is especially important so they can manage their own gear.
Installation and Care of Your Evoshield Throat Guard
Getting your Evoshield throat guard installed and keeping it in good condition is straightforward. Proper care ensures its longevity and continued effectiveness.
How to Attach Your Throat Guard
The installation process typically involves a few simple steps:
1. Identify Attachment Points: Locate the designated slots or straps on your helmet or mask where the throat guard is designed to connect.
2. Secure the Guard: Depending on the model, you might have straps that loop around the mask frame or clips that snap into place. Ensure the guard is firmly attached and doesn’t wobble.
3. Adjust for Fit: Make sure the guard sits correctly against your throat area, providing coverage without being uncomfortable or obstructing your vision. Some models may have adjustable straps for a custom fit.
4. Test for Movement: Gently move your head from side to side and up and down to ensure the guard stays in place and doesn’t impede your movement.
Cleaning and Maintenance Tips
Keeping your Evoshield throat guard clean is important for hygiene and to maintain its material integrity.
Wipe Down: After each use, wipe the guard with a damp cloth to remove sweat and dirt.
Mild Soap: For tougher grime, use a mild soap and water solution. Rinse thoroughly with clean water.
Air Dry: Always allow the gear to air dry completely before storing it. Avoid direct heat sources, as this can damage the materials.
Inspect Regularly: Periodically check the guard for any signs of wear and tear, such as cracks or loose straps. If you notice any damage, it’s time to consider a replacement.
The Importance of Proper Safety Gear in Baseball
Baseball safety extends beyond just the throat guard. It’s a holistic approach to protecting athletes so they can focus on developing their skills and enjoying the game. Evoshield is dedicated to providing a range of protective equipment for this very reason.
Beyond the Throat Guard: Essential Baseball Safety Gear
Helmets: A fundamental piece of equipment for all batters and base runners, protecting against pitched balls and accidental collisions. Major League Baseball requires a specific standard of helmet safety, an example that youth leagues often follow. For reference, you can look at standards set by organizations like the Baseball Equipment Quality Standards (BAQSC), which often influence manufacturing.
Catcher’s Mitt: While not directly protective in the same way, a well-padded catcher’s mitt is crucial for safely receiving pitches and reducing the impact on the hand and wrist.
Sliding Shorts/Pants: These help protect against abrasions during slides.
Mouthguards: Recommended for all players, especially catchers and infielders, to protect against dental and jaw injuries.
* Shin Guards and Chest Protectors (for Catchers): These are standard for catchers, offering protection from foul balls and wild pitches.
Creating a Culture of Safety
Ultimately, the most effective approach to safety in baseball is to foster a culture where protective gear is seen not as a sign of weakness, but as a smart, strategic choice for any serious player. Coaches and parents play a huge role in modeling this behavior and educating young athletes about the benefits of using appropriate safety equipment.
Evoshield Throat Guard vs. Other Options: A Comparative Look
When it comes to protecting the throat, there are various products on the market. Evoshield stands out due to its innovation and design philosophy focused on athlete performance without sacrificing safety.
Key Differentiators of Evoshield
| Feature | Evoshield Throat Guard | Generic Throat Guards | No Throat Protection |
|---|---|---|---|
| Impact Absorption | High, with specialized padding designed to disperse force. | Varies greatly; often basic foam or hard plastic with less dispersion technology. | None. |
| Comfort & Fit | Designed for close fit and comfort, often lightweight. | Can be bulky or ill-fitting, sometimes restricting movement. | N/A. |
| Durability | Built with high-quality, long-lasting materials. | Quality can be inconsistent, leading to quicker wear and tear. | N/A. |
| Brand Reputation & Technology | Established brand with a focus on athletic protection technology. | Often unbranded or less recognized; may lack specific protective engineering. | N/A. |
When Budget is a Concern
It’s understandable that budget can be a factor, especially for families with multiple young athletes. While Evoshield represents a premium option, even a basic, well-fitting throat guard is significantly better than none. Look for sales, consider reputable sporting goods stores, and when possible, invest in gear that prioritizes safety engineering. For example, reputable sports equipment manufacturers adhere to safety guidelines that aim to protect athletes, and understanding these can guide purchasing decisions.
Maximizing Your Game with Confidence
Knowing you have a reliable Evoshield throat guard in place allows you to play with an amplified sense of confidence. This is especially true for younger players who might still be developing their reflexes, or for catchers who are constantly in a high-risk position. When players feel secure, they can focus more intently on their performance, leading to better plays, fewer errors, and a more enjoyable experience overall. This psychological boost is a significant, though often overlooked, benefit of wearing proper protective gear.
Frequently Asked Questions (FAQ) about Evoshield Throat Guards
Are Evoshield throat guards really necessary for youth baseball?
Yes, for many youth leagues, especially for catchers, they are mandatory. Even if not required, they are highly recommended to protect against serious injury from errant pitches or foul balls. It’s always better to have an extra layer of safety.
How do I attach an Evoshield throat guard to my helmet?
Most Evoshield throat guards attach using straps or clips that secure to the framework of your baseball helmet or mask. Check the specific model’s instructions, but generally, it involves threading straps or snapping clips into place to ensure a snug fit.
Can I wear an Evoshield throat guard with any helmet?
Evoshield throat guards are designed to be compatible with most standard baseball helmets and catcher’s masks. However, it’s always best to check the product description for compatibility information or to test the fit before purchasing if possible.
How do I clean and maintain my Evoshield throat guard?
Clean your throat guard by wiping it with a damp cloth after each use. For tougher dirt, use a mild soap and water solution, then rinse and air dry completely. Avoid excessive heat, which can damage the material.
Will an Evoshield throat guard affect my vision or movement?
Evoshield designs its gear to be as unobtrusive as possible. When properly fitted, a throat guard should not significantly impact your vision or restrict your head movement. Its ergonomic design ensures it stays in place without getting in the way.
Is an Evoshield throat guard worth the investment?
Absolutely. The cost of an Evoshield throat guard is minimal compared to the potential cost and severity of a throat injury. It provides essential protection, allowing players to focus on their game with greater confidence.
Conclusion: Prioritizing Protection for a Better Game
In the fast-paced world of baseball, safety should always be a top priority. The Evoshield throat guard stands out as a testament to how innovative design and quality materials can provide crucial protection without hindering performance. Whether you’re a catcher crouched behind the plate, an infielder ready for a sharp grounder, or a parent looking out for their young athlete, understanding the importance of gear like the Evoshield throat guard is key. It’s more than just an accessory; it’s a vital piece of equipment that helps prevent serious injuries, allowing players to step onto the field with confidence and focus on what they do best – playing the game they love. By choosing smart, reliable protective gear, you’re not just playing it safe; you’re investing in a longer, more enjoyable baseball journey.