Imagine standing on a brand-new pitching mound. You can feel the cool dirt beneath your feet. The sun shines brightly as you look around the field. Doesn’t it feel awesome to be on the mound, ready to pitch? Building a pitching mound for baseball can make that dream a reality.
Why is a good mound so important? A proper mound gives pitchers the boost they need. It helps them throw better and feel confident. Plus, it’s fun to create something with your own hands!
Did you know that the best pitching mounds are built with care? They’re made to be the right height and shape. This helps players perform at their best. Whether you’re a big league fan or just starting out, learning how to build a pitching mound is exciting!
So, what are you waiting for? Let’s dive into the steps to build a pitching mound that will make your baseball experience unforgettable!
How To Build A Pitching Mound For Baseball: A Complete Guide

Build a Pitching Mound for Baseball
Building a pitching mound for baseball can be a fun project. It starts with choosing the right spot, usually on a flat area of grass or dirt. You’ll need to dig the base and create a slope for the pitcher. Using a mix of soil and clay helps maintain shape. Did you know that the best mounds are about 10 inches high? With careful planning, you can create a space that helps players improve their game and practice effectively.Planning Your Pitching Mound Project
Factors to consider when choosing a location. Tools and materials needed for construction.Picking the right spot for your pitching mound is important. Look for a flat area that gets sunlight and has good drainage. This will help the mound last longer. Think about how far it is from your home and the field too. You want easy access! For building, gather some basic tools and materials:
- Shovel
- Level
- Tamper
- Sand
- Soil
- Concrete (if needed)
With careful planning, you can make a great pitching mound that will be fun to use!
What should I consider when choosing a location?
Choose a spot that is flat and sunny. Make sure it drains well so rainwater won’t make a muddy mound. Accessibility is also key; you need to easily get to the mound.
Step-by-Step Guide to Building a Pitching Mound
Preparing the site: clearing and leveling the ground. Constructing the mound: layering and shaping the dirt.First, clear and level the ground where your pitching mound will stand. Remove grass, rocks, and debris. This makes a good base. Next, shape the mound layer by layer. Start with a solid dirt base and create a slope. Make it about 10 inches high at the back and lower at the front. This helps pitchers throw better. Use a shovel, rake, and your hands to mold the dirt. Make it smooth and even.
How do you build a pitching mound for baseball?
You build a pitching mound by preparing the site first, then constructing it with layers of dirt.
Key Steps:
- Clear the area of debris.
- Level the ground.
- Shape the mound with dirt layers.
- Ensure smooth slopes for better performance.
Maintaining Your Pitching Mound
Recommended practices for upkeep and longevity. Seasonal maintenance tips and repairs.Keeping your pitching mound in top shape is important. Regular maintenance helps it last longer and keeps the game fun. Always check for cracks or uneven spots. Fill them in quickly to avoid bigger problems. Seasonal changes? No problem! In spring, add fresh dirt to the mound, and in fall, clear debris. Remember, even the best mounds need a little love! If you do it right, maybe you can even make your mound famous, like the home run hitters of baseball!
| Season | Maintenance Tips | Repairs Needed |
|---|---|---|
| Spring | Add fresh dirt and check for cracks. | Fill in any holes. |
| Summer | Keep grass trimmed and edges neat. | Repair any wear areas. |
| Fall | Clear leaves and debris. | Touch up loose spots. |
| Winter | Cover the mound to protect it. | None needed if covered! |
Common Mistakes to Avoid When Building a Pitching Mound
Issues related to improper measurements and drainage. Tips for avoiding structural weaknesses in design.Building a pitching mound can be fun, but watch out for some common blunders! First, incorrect measurements can lead to a mound that feels more like a hill. Make sure your calculations are spot on! Also, drainage issues may turn your mound into a swamp after rain. Yikes! To avoid structural weaknesses, use sturdy materials and create a solid base. No one wants a collapsing mound during the big game! Here’s a quick table with tips:
| Common Mistakes | How to Avoid Them |
|---|---|
| Incorrect Measurements | Double-check dimensions before digging! |
| Poor Drainage | Ensure proper slopes away from the mound. |
| Weak Structure | Use high-quality materials for stability. |
Pay attention to these details and your pitching mound will be a home run!
Customization Options for Your Pitching Mound
Enhancements to consider: slope adjustments and surface types. Incorporating personal touches: branding or team colors.There are many ways to customize your pitching mound. Adjusting the slope is one option. A better slope can help pitchers throw with more power. You can also choose different surface types. Some prefer clay, while others like grass. Adding personal touches makes it special. Think about your team colors or logo. These details show team spirit and pride!
What should you consider for a pitching mound?
Think about slope, surface type, and adding personal touches like team colors.
Enhancements to consider:
- Slope adjustments for better performance
- Surface types like clay or grass
Incorporating personal touches:
- Team logo on the mound
- Using favorite team colors
Resources and Tools for Further Learning
Recommended books, websites, and videos on pitching mound construction. Local experts or services that can assist with building a mound.Learning about building a pitching mound can be fun and helpful. For deeper understanding, check out these resources:
- Books: “The Science of Hitting” by Ted Williams provides great insights.
- Websites: MLB’s official site has tips and guidelines.
- Videos: Search YouTube for instructional videos on mound building.
You can also find local experts. Ask around at your community baseball field or sports center. They might assist you with building a mound and share valuable advice!
What are some useful resources for building a pitching mound?
Books, videos, and websites are great resources. Try watching instructional videos or reading guides to learn the best methods!
Conclusion
Building a pitching mound for baseball is fun and important for practice. Choose the right materials, like clay and dirt, for a sturdy mound. Follow the right dimensions to help players pitch better. You can find helpful guides online to make it easier. Start your project today, and enjoy every pitch on your new mound! Keep learning and improving your skills!FAQs
Certainly! Here Are Five Related Questions About Building A Pitching Mound For Baseball:Building a pitching mound for baseball is fun! First, you need to choose a good spot in the field. Then, find the right dirt to shape the mound. Make sure it’s high enough but not too steep. Finally, we can use a level to make sure it is flat at the top. Now you’re ready to pitch!
Of course! Please share the question you’d like me to answer.
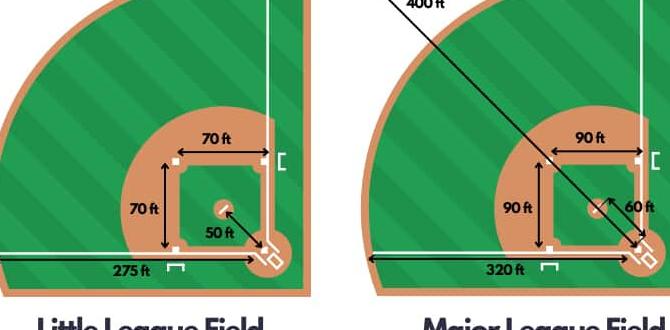
What Are The Standard Dimensions And Height Specifications For A Regulation Baseball Pitching Mound?A regulation baseball pitching mound is 60 feet, 6 inches away from home plate. It is 10 inches high in the center. The mound is a circle with a 18-foot diameter. You can think of it like a small hill where the pitcher stands!
What Materials Are Recommended For Constructing A Durable And Effective Pitching Mound?To build a strong pitching mound, you should use clay and dirt. Clay helps hold the shape and firmness. You can mix in some sand for better drainage. Adding grass or turf on top can help it last longer and look nice. Make sure you pack the materials tightly so it stays sturdy when you pitch.
How Do You Properly Grade And Compact The Soil To Ensure Stability And Drainage For The Pitching Mound?To grade the soil, you need to make it level where the pitching mound will be. Use a shovel and rake to smooth it out. Next, compact the soil by stepping on it or using a tamper tool. This makes the ground strong and helps water to drain away. Check the slope to make sure water runs off and doesn’t pool.
What Are The Best Practices For Maintaining The Pitching Mound To Ensure Consistent Performance Throughout The Season?To keep the pitching mound in good shape, we need to groom it regularly. You should check for any uneven spots and fix them. Water the mound to keep it soft, but not too wet. After games, make sure to pack down the dirt. This helps the mound stay firm and gives better pitches!
How Can You Incorporate Safety Features Into The Design Of A Pitching Mound To Prevent Injuries For Pitchers?To make a pitching mound safer, we can add softer materials on top. This helps reduce the chance of injuries when pitchers fall. We can also make the mound a little wider for better balance. Adding a rubber surface can help pitchers grip better and avoid slipping. Lastly, we should check the mound for any holes or bumps to keep it smooth and safe.
{“@context”:”https://schema.org”,”@type”: “FAQPage”,”mainEntity”:[{“@type”: “Question”,”name”: “Certainly! Here Are Five Related Questions About Building A Pitching Mound For Baseball:”,”acceptedAnswer”: {“@type”: “Answer”,”text”: “Building a pitching mound for baseball is fun! First, you need to choose a good spot in the field. Then, find the right dirt to shape the mound. Make sure it’s high enough but not too steep. Finally, we can use a level to make sure it is flat at the top. Now you’re ready to pitch!”}},{“@type”: “Question”,”name”: “”,”acceptedAnswer”: {“@type”: “Answer”,”text”: “Of course! Please share the question you’d like me to answer.”}},{“@type”: “Question”,”name”: “What Are The Standard Dimensions And Height Specifications For A Regulation Baseball Pitching Mound?”,”acceptedAnswer”: {“@type”: “Answer”,”text”: “A regulation baseball pitching mound is 60 feet, 6 inches away from home plate. It is 10 inches high in the center. The mound is a circle with a 18-foot diameter. You can think of it like a small hill where the pitcher stands!”}},{“@type”: “Question”,”name”: “What Materials Are Recommended For Constructing A Durable And Effective Pitching Mound?”,”acceptedAnswer”: {“@type”: “Answer”,”text”: “To build a strong pitching mound, you should use clay and dirt. Clay helps hold the shape and firmness. You can mix in some sand for better drainage. Adding grass or turf on top can help it last longer and look nice. Make sure you pack the materials tightly so it stays sturdy when you pitch.”}},{“@type”: “Question”,”name”: “How Do You Properly Grade And Compact The Soil To Ensure Stability And Drainage For The Pitching Mound?”,”acceptedAnswer”: {“@type”: “Answer”,”text”: “To grade the soil, you need to make it level where the pitching mound will be. Use a shovel and rake to smooth it out. Next, compact the soil by stepping on it or using a tamper tool. This makes the ground strong and helps water to drain away. Check the slope to make sure water runs off and doesn’t pool.”}},{“@type”: “Question”,”name”: “What Are The Best Practices For Maintaining The Pitching Mound To Ensure Consistent Performance Throughout The Season?”,”acceptedAnswer”: {“@type”: “Answer”,”text”: “To keep the pitching mound in good shape, we need to groom it regularly. You should check for any uneven spots and fix them. Water the mound to keep it soft, but not too wet. After games, make sure to pack down the dirt. This helps the mound stay firm and gives better pitches!”}},{“@type”: “Question”,”name”: “How Can You Incorporate Safety Features Into The Design Of A Pitching Mound To Prevent Injuries For Pitchers?”,”acceptedAnswer”: {“@type”: “Answer”,”text”: “To make a pitching mound safer, we can add softer materials on top. This helps reduce the chance of injuries when pitchers fall. We can also make the mound a little wider for better balance. Adding a rubber surface can help pitchers grip better and avoid slipping. Lastly, we should check the mound for any holes or bumps to keep it smooth and safe.”}}]}