Flaring a baseball glove gives you a better grip on the ball and makes it easier to throw and catch. Flaring a baseball glove gives ballplayers extra power when batting and pitching.
And it also makes the Glove more comfortable to wear. If so, you’ll love learning how to flare a baseball glove correctly. In this blog post, we’ll cover everything you need to know about flaring a baseball glove – from what it is to why you should do it to the different ways you can do it. So go ahead and start flaring those gloves like a pro.
What Is A Baseball Glove?
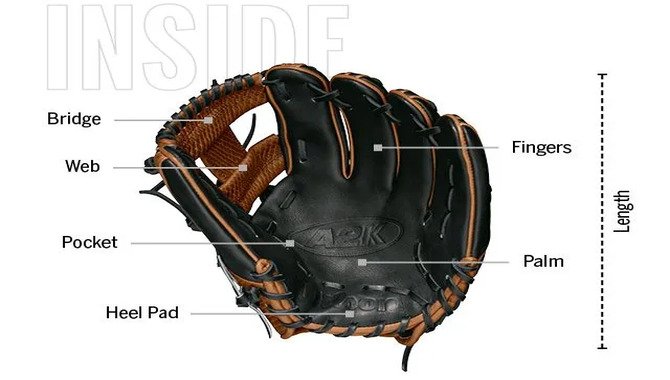
A baseball glove is a protective device worn by players in the sport of baseball. It is mostly leather, with a short handle and a large palm area. The purpose of the Glove is to protect the player’s hand from injuries caused by batting or fielding the ball.
The main part of the Glove that protects the hand is called the “mitt.” The mitt attaches to the player’s arm by straps and typically has three fingers cut away to easily extend and contract. The thumb hangs off slightly, allowing for quick movement of the index finger when catching or throwing the ball.
Why Flare A Baseball Glove?
There are several reasons to flare your Glove. First, flare it when batting to better grip the ball. Flaring the mitt creates more surface area in contact with the ball, which gives you more power when batting and increases your chances of sticking out your hand and hitting the ball hard.
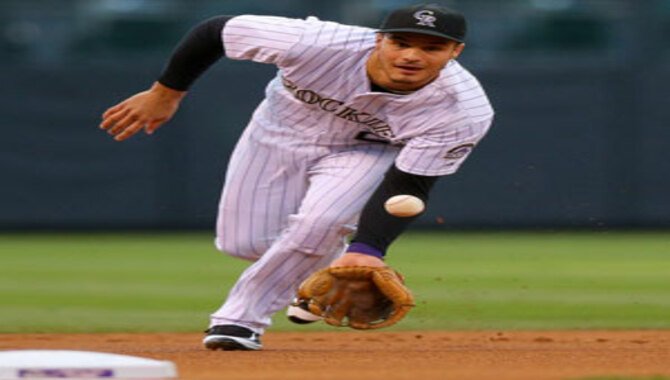
Flare it when fielding the ball so that you can keep your palm open for better balance and control. Holding onto the Glove with both hands will help prevent injuries from occurring as you try to make a leaping grab or block an incoming pitch.
Finally, flare it when catching the ball to prevent it from flying out of your hand. When the mitt is flare-shaped, the surface area of the Glove is larger and more contoured than when it’s not flared, which gives you a firmer grip on the ball. This can help you catch difficult fly balls or keep them in bounds.
Types Of Baseball Gloves
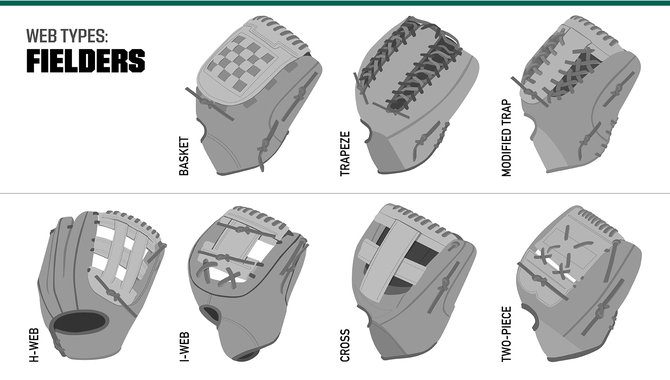
Choosing the right baseball glove is essential for a successful batting practice session. There are three main types of baseball gloves: the infielder’s mitt, the outfielders’ mitt, and the catcher’s mitt. Choosing the right type of Glove for your batting style and size hands is important.
Infielder’s Mitt: This is the most common type of Glove and is designed for protection against batting and fielding injuries. It has a short handle and a large palm area. The thumb hangs off slightly, allowing for quick movement of the index finger when catching or throwing the ball.
Outfielders’ Mitt: Similar to an infielder’s mitt but designed to protect against catching fly balls in the center or right field. It has a long handle and a small palm area. The thumb hangs off slightly, allowing for quick movement of the index finger when catching or throwing the ball.
Catcher’s Mitt: Similar to an infielder’s mitt but designed specifically for catching fly balls in center field or right field. It is wider than an infielder’s mitt and has a short handle that is similar to those used by pitchers. The thumb hangs off slightly, allowing for quick movement of the index finger when catching or throwing the ball.
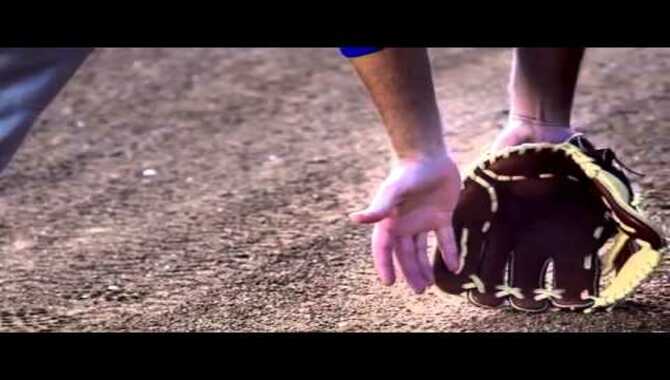
How To Flare A Baseball Glove The Right Way
Flaring a baseball glove is a skill that many players need to learn to protect their hands and arm when catching or throwing the ball. Flaring the Glove correctly ensures that the ball doesn’t hit the hand or fingers directly, which can cause serious injuries. There are a few steps you need to follow to flare your baseball glove correctly:
- Hold the Glove by the backhand side with your thumb on top of the batting Glove and your four fingers underneath.
- Bend your wrist so your palm faces you and is parallel to the ground.
- Extend your fingers outwards until they nearly touch each other, then snap them back towards your body. This will create an “S” shape with the back of your hand pointing towards the sky and your fingers pointing down.
- Holding this pose, slowly bring your hand up towards the front of your face until it reaches eye level. Keep it there for a second before slowly lowering it back down again so that you have created a “U” shape with both hands.
- Repeat these steps as needed during each catch or throw, flaring each Glove individually to ensure accuracy.
8 Tips For Flaring A Baseball Glove
Flaring a baseball glove is an important step for enhancing the comfort and performance of the Glove. It can make catching the ball more comfortable and help the glove grip it better. Here are 8 tips for flaring a baseball glove:
1. Heat The Oven
Flaring a baseball glove is an important step in restoring its former glory. It helps restore the shape and durability of the Glove while improving the leather’s flexibility and grip. You can do this by heating an oven mitt or kitchen gloves before placing the baseball glove inside. Preheat the oven to 200 degrees Fahrenheit (93 degrees Celsius). After 10 minutes, remove it from the heat and let it cool down before using it as you would normally.
2. Put Some Oil On The Glove
Adding a little oil to your Glove before flaring it will help to soften the leather and keep it from cracking. This is especially important if you use an oven mitt or kitchen gloves, as these are not made of the best quality leather.
3. Prepare To Shape
Shaping a golf ball is an important process that needs to be done correctly to achieve the desired results. The right equipment, including the right Glove and ball, patience, and consistency, are essential tools in your shaping arsenal. Before you begin this process, it is important to measure your hand size so that you purchase the correct gloves.
The gloves should fit snugly but not move around when you hit the ball- this will ensure proper grip and control of the clubface throughout your swing. As for the ball itself, make sure it’s slightly harder than what you’re used to swinging – this will help improve accuracy and provide better flare (jump). Be patient, as shaping can take some time but eventually – once practiced often enough – it will produce good results!
4. Insert A Ball In The Glove
Now that you have prepared the Glove and ball, it’s time to start. To insert the ball, ensure your hand is clean and dry. Next, place your hand in the palm of the Glove so that your thumb and index finger are lined up along each side of the handle. Then carefully place the ball between these fingers- ensure not to touch any other part of the Glove with your hands or fingers while doing so. Once you have inserted the ball into the Glove, close it gently around it by folding one flap over the top of another.
5. Shape The Pocket
To begin, sketch the pocket flare you want to achieve. Then use tailor’s chalk to draw in the pocket’s shape- making necessary corrections if needed. Cut out your pocket with a tailor’s knife and carefully press it down into place. Sew it together using either thread or stitches (seam allowance should be 1/2 inch). Trim off any excess fabric, and you’re good to go.
6. Dry Off Your Glove
When it comes to keeping your baseball glove in good condition, ensuring it is always moist is of the utmost importance. This will prevent the leather from cracking or peeling and also help protect your hand from harsh weather conditions. To dry off your Glove, use a towel or air-drying it – whichever feels more comfortable. Make sure to store your gloves in a cool and dry place so they last longer.
7. Put Your Glove Away
Playing sports or participating in any physical activity can be loads of fun, but taking care of your gear is important. Remember: never put your Glove away until you are done playing, and make sure you clean it properly after each use. And lastly – hang it up to dry, so the leather remains soft and supple.
8. Apply Leather Conditioner
Leather is very durable, but like any other piece of equipment, it needs to treat with care. That’s why applying leather conditioner before you start flaring the Glove is important – this will help keep the leather soft and supple. Don’t use too much conditioner – just enough so that the Glove feels slightly tacky when you touch it. Allow it to dry completely before storing it in your glove box or bag.
The Different Ways To Flare A Baseball Glove

Flaring a baseball glove is an important part of the game, and there are several ways to do it. The most common way to flare a baseball glove is by cupping your hand around the back of the ball and giving it a quick snap. This allows you to control the velocity and direction of the ball better, which allows you to hit it harder and farther.
Another way to flare a baseball glove is by making an “X” with your hand. This position stabilizes the ball more, providing more power when you hit it. You can also flare your baseball glove by making a “W” with your hand. This position makes sure that the ball goes straight to home plate.
Benefits Of Flaring A Baseball Glove
Flaring a baseball glove is a technique used to improve its performance. It’s also known as “cupping” or “pinching.” There are several benefits of flaring a baseball glove. The first and most important benefit is that it makes the ball more difficult for the opponent to handle. This is because the cupping forces the air out of the ball, which makes it harder for them to grip and throw it.
Another benefit of flaring a baseball glove is increasing your accuracy when hitting balls. When you flare the ball, you create more friction between your hand and the ball, which gives you more control over where it goes. This means you can hit balls with greater accuracy and power, making you much more successful on the field.
Finally, flaring a baseball glove also helps protect your hand from injury. When you hit a ball with full force, the impact can harm your hand if not done properly. By flaring your Glove, you reduce this impact by spreading the force across a larger area.
Conclusion
Baseball is one of the most popular sports in the world, and for a good reason – it’s a great way to spend quality time with your friends and family. However, you may be at a disadvantage if you’re not a skilled player. That’s where flared baseball gloves come in – they help improve your batting skills by giving you a better grip on the ball.
In this blog post, we have covered the different types of baseball gloves, how to flare them the right way, and some additional benefits of using a flared baseball glove. So make sure to bookmark this page and return for more helpful information on playing your best baseball.
Frequently Asked Questions:
1.What Is The Best Way To Flare A Baseball Glove?
Ans: You can flare a baseball glove in a few different ways, but the most common way is to use an elastic band. You simply place the elastic band around your Glove’s thumb and index finger, then put the Glove on your hand and fix it. This will help to create more consistent power and spin when batting.
2.How Can I Avoid Getting My Hands Wet When I’m Flaring My Baseball Glove?
Ans: There are various ways to avoid getting your hands wet when flaring your baseball glove, but the most popular and practical solution is using a glove stretcher. This device helps to keep your gloves stretched out so that they don’t touch each other or the ground, which will cause water to seep in and ruin them.
Alternatively, you can use a spray bottle filled with water to pour it inside the palms of your baseball gloves. Doing this will help to avoid getting your hands wet and prevent the gloves from deteriorating prematurely. Some people also use oven mitts or towels as they can easily hold onto them while you flare the Glove.
3.What Are Some Other Things That I Need To Take Into Account When Flaring A Baseball Glove?
Ans: When flaring a baseball glove, there are a few things you need to keep in mind. The most important factors are the pocket, the seams, and your fingers. Proper hand shaping ensures that the ball will not fly out of the Glove easily.
The pocket should be large enough so that your palm does not touch any part of the stitching when catching or throwing a batted ball. The seams must be tight so that air doesn’t leak out during gameplay and prevent undue wear on your hand over time.
4.Can I Use Any Type Of Adhesive To Flare My Baseball Gloves?
Ans: When flaring your baseball gloves, the best adhesive to use is a strong one suitable for leather. Make sure to clean the surface of your Glove well before applying the adhesive, and press the strips firmly against each other to form a V shape. Leave your gloves to cure overnight before using them.
5.Is It Possible For Me To Ruin My Batting Gloves If I Don’t Flare Them Properly?
Ans: No, you will not ruin your batting gloves if you flare them properly. Flaring a baseball glove is important in keeping it in good condition and prolonging its lifespan. There are different methods to flare a batting glove, but the most recommended method is to use fabric glue and let it dry for at least 12 hours.