Properly fitting your Under Armour catchers throat guard is key to comfort and protection behind home plate. This guide ensures a secure, snug fit, minimizing distractions and maximizing safety so you can focus on the game.
Catching is a demanding position, and staying protected is paramount. One crucial piece of equipment for any catcher is the throat guard. It’s designed to shield that vulnerable area from errant pitches and foul tips. But what happens when your Under Armour throat guard feels a bit off – too loose, too tight, or just plain uncomfortable? It’s a common frustration for players, especially beginners.
A poorly fitting guard can be a major distraction, and worse, it might not offer the protection you need. Don’t worry! Getting that perfect, secure fit is simpler than you might think. We’ll walk you through every step to ensure your Under Armour throat guard sits just right, boosting your confidence and keeping you safe. Let’s get your gear dialed in!
Why a Proper Fit Matters for Your Under Armour Catchers Throat Guard

You’ve picked out your Under Armour catcher’s helmet, and now it’s time to make sure every part of it is giving you the best protection. The throat guard is a small but mighty component. When it fits correctly, it stays put. This means you’re less likely to have it shift or move around, no matter how fast the pitch or how hard you’re squatting and moving. A loose guard can be a safety hazard, as it might not cover your throat effectively when you need it most. On the flip side, a guard that’s too tight can be incredibly uncomfortable, leading to distractions and even neck strain over a long game or practice. Think of it like wearing a backpack – if it’s not adjusted properly, it can feel heavy and pull in the wrong places. Your throat guard should feel like a natural extension of your helmet, providing reliable security without you even noticing it’s there.
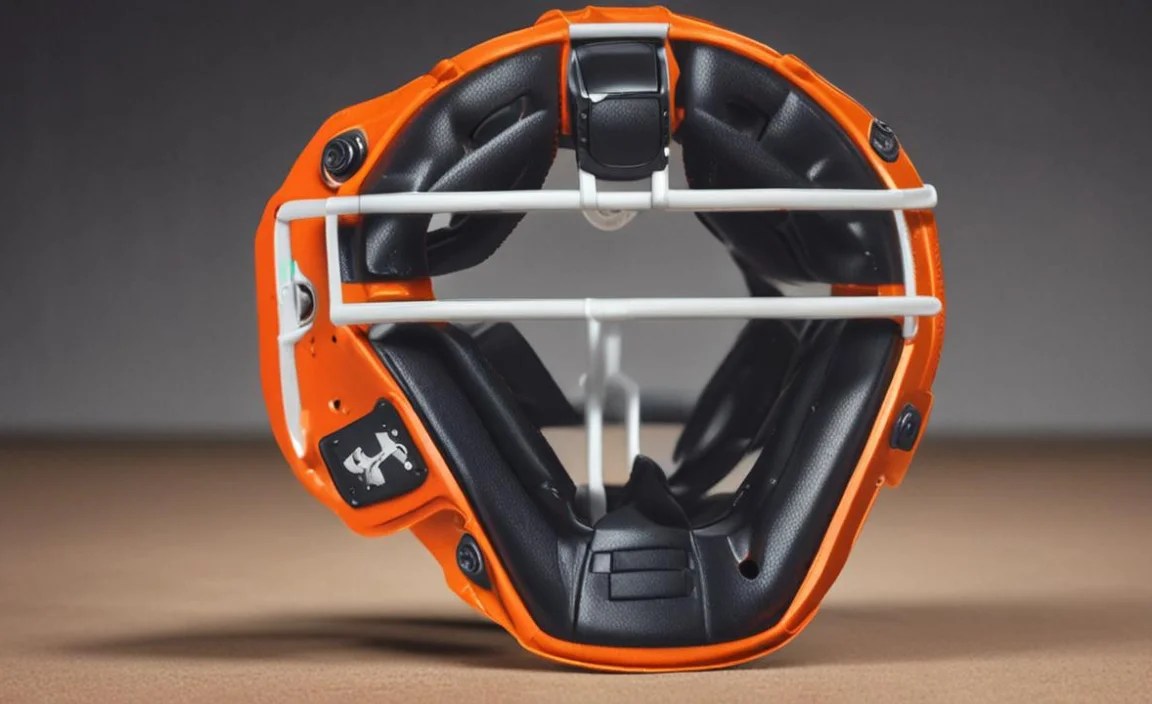
Understanding Under Armour Throat Guard Design

Under Armour is known for its innovative gear, and their catcher’s throat guards are no exception. While specific models might have slight variations, most Under Armour throat guards attach to the cage of the catcher’s helmet. They are typically made from durable plastic designed to absorb impact. The key to a good fit usually lies in how it mounts and how it contours to the face. Some guards are designed with a slight curve to better follow the natural line of the neck and jaw. Others might offer more adjustability, allowing you to fine-tune the position. Understanding these basic design principles helps you appreciate what you’re working with as you go through the fitting process.
Essential Tools and Preparations for Fitting
Before you start adjusting, let’s make sure you have everything you need and you’re ready to go. You don’t need a whole toolbox, but a few simple things will make the process smooth and effective.
- Your Catcher’s Helmet: Make sure it’s clean and ready.
- Your Under Armour Throat Guard: Have it handy, with any included screws or fasteners.
- A Phillips Head Screwdriver: Most throat guards use small Phillips head screws. Having a correctly sized one prevents stripping the screw heads.
- A Soft Cloth: For wiping down any parts if needed.
- A Mirror (Optional but Recommended): Looking in a mirror as you fit helps ensure it’s positioned correctly from all angles.
- A Buddy or Coach (Optional): Sometimes, it’s easier to have someone else check the fit and tightness from behind you.
Before you attach anything, take a moment to look at the mounting points on your catcher’s helmet cage and on the throat guard itself. Identify where the screws or clips will go. This preliminary check can save you a lot of fumbling around.
Step-by-Step Guide to Fitting Your Under Armour Catcher’s Throat Guard

Getting the perfect fit is a straightforward process. Follow these steps carefully to ensure your Under Armour throat guard is attached securely and comfortably.
- Inspect the Helmet Cage and Throat Guard: Before attaching, examine the designated mounting points on your catcher’s helmet cage. These are usually pre-drilled holes or wire loops. Do the same for your Under Armour throat guard. Ensure there are no obstructions, and that the screw holes align properly.
- Position the Throat Guard: Hold the throat guard in place against the front of the helmet cage. The general goal is to have the lower edge of the guard sit just below your chin, covering the soft tissue of your throat. It should curve inwards to follow the shape of your jawline and face.
- Align Mounting Points: Carefully align the holes on the throat guard with the corresponding holes or attachment points on the helmet cage.
- Insert Fasteners (Screws or Clips): If your guard uses screws, gently insert them through the aligned holes. Start by hand-tightening them. If it uses clips or a snap-on system, ensure they are properly engaged.
- Hand-Tighten All Fasteners: Once all screws or clips are in place, hand-tighten them as much as you comfortably can. This ensures the guard is stable before you apply any tool.
- Begin Gradual Tightening with a Screwdriver (if applicable): If using screws, begin to tighten them with your Phillips head screwdriver. Do not overtighten! Tighten each screw a little at a time, moving between them. This helps to ensure the guard mounts evenly and prevents stress on the plastic.
- Check for Gaps and Snugness: As you tighten, periodically check how the guard is sitting. There should be no significant gaps between the guard and the helmet cage. It should feel snug but not overly forced.
- Test for Movement: Once all fasteners are snug, gently try to wiggle the throat guard. It should not move freely. There should be minimal to no play.
- Perform a Fit Test (Wearing the Helmet): Put on your catcher’s helmet. Adjust the helmet straps for a comfortable, secure fit. Once the helmet is on, check the throat guard positioning. Does it cover the intended area? Is it digging into your neck or chin? Can you breathe and speak comfortably?
- Make Minor Adjustments: Based on your fit test, you might need to loosen or slightly reposition the guard. If it feels too high, you might need to adjust the attachment points to allow it to sit lower. If it feels too loose or wobbly, re-tighten the screws evenly, ensuring they are snug but not so tight they risk cracking the plastic.
Video Example: Watching a Professional Fit a Throat Guard

Sometimes, seeing is believing! While we can’t embed a video here directly, imagine watching a short, clear video demonstrating this process. The video would likely show a coach or player attaching an Under Armour throat guard to a helmet, pointing out the screw locations, aligning the guard, and using a screwdriver to tighten it incrementally. They would emphasize checking for wobble and then, importantly, put on the helmet to show how the guard sits against the neck and jaw. This visual aid reinforces the importance of even tightening and a comfortable, protective position.
You can often find excellent fitting guides on YouTube by searching for terms like “how to attach catcher’s throat guard” or “baseball catcher helmet throat guard installation.” Look for videos from reputable baseball equipment retailers or coaching channels. Many Under Armour product pages also include helpful videos or diagrams.
Common Fitting Issues and How to Solve Them
Even with a step-by-step guide, you might encounter a snag. Here are some common problems players face and how to fix them:
- Throat Guard Feels Too Loose/Wobbly:
- Cause: Screws aren’t tight enough, wrong screws used, or mounting points are worn.
- Solution: Ensure you’re using the correct screws designed for the guard. Tighten them incrementally and evenly. If the mounting holes on the helmet cage are enlarged or stripped, you might need a minor repair or consider a helmet with better-maintained cage points. For minor wobbles, sometimes a small piece of rubber or plastic (like from a washer) judiciously placed behind the mounting point can provide a snugger fit.
- Throat Guard Feels Too Tight or Digs In:
- Cause: Over-tightening, wrong positioning, or the guard design isn’t compatible with your helmet’s cage shape.
- Solution: Loosen the screws slightly. Try repositioning the guard higher or lower on the cage. Some guards might have a specific curve that works better in a particular orientation. If it consistently digs into your chin or neck, carefully inspect the guard’s edges for any sharp molding imperfections. You can very carefully and lightly sand down any sharp plastic edges with fine-grit sandpaper if needed, but exercise caution not to weaken the guard.
- Throat Guard Doesn’t Cover Enough Area:
- Cause: Guard is positioned too high, or it’s the wrong size/model for your helmet.
- Solution: Ensure the guard is mounted as low as possible on the cage while still being secure. If it’s still not covering adequately, it might be time to consult the equipment manual or consider if this particular throat guard model is the right fit for your Under Armour helmet. Compatibility is key.
- Screws Won’t Go In or Strip Easily:
- Cause: Misaligned holes, wrong screwdriver size, or damaged screw heads/holes.
- Solution: Ensure the holes are perfectly aligned before trying to screw. Use a high-quality Phillips head screwdriver that fits precisely into the screw head. If screws are stripping, stop immediately. You might need a screw extractor or professional help to remove them without damaging the helmet cage further.
- Difficulty Attaching Clips or Snap-On Systems:
- Cause: Obstructions, misalignment, or clips are stiff.
- Solution: Ensure the cage is clear. Align the clips carefully before applying pressure. Sometimes, a little firm, consistent pressure is needed. If they seem excessively stiff, double-check that you’re attaching them in the correct orientation as per the product’s instructions.
Table: Under Armour Throat Guard Fitting Checklist
Use this handy checklist to ensure you’ve covered all the bases when fitting your throat guard.
| Step | Action | Status (Check When Done) |
|---|---|---|
| 1 | Helmet cage and throat guard mounting points inspected for damage or debris. | ☐ |
| 2 | Throat guard positioned correctly to cover the throat area without obstructing breathing. | ☐ |
| 3 | Mounting holes on the guard and cage are perfectly aligned. | ☐ |
| 4 | All screws/fasteners are inserted and hand-tightened. | ☐ |
| 5 | Screws are tightened incrementally and evenly using the correct screwdriver. | ☐ |
| 6 | Throat guard feels snug and does not wobble significantly. | ☐ |
| 7 | Comfort test: No pinching, digging, or excessive pressure on the chin/neck when helmet is worn. | ☐ |
| 8 | Visibility test: Guard does not obstruct the player’s primary field of vision. | ☐ |
Safety and Maintenance Tips for Your Throat Guard
Once your Under Armour throat guard is perfectly fitted, it’s important to keep it in good condition. This ensures it continues to provide reliable protection game after game.
- Regular Cleaning: After games and practices, wipe down your throat guard with a damp cloth. This removes sweat, dirt, and grime that can degrade the plastic over time. Mild soap and water are usually fine if needed, but always rinse thoroughly and allow it to air dry completely.
- Inspect for Cracks and Damage: Periodically, and especially after any hard impacts, give your throat guard a thorough inspection. Look for any signs of cracking, deep scratches, or deformation. If you find any damage, it’s crucial to replace the guard immediately. A compromised guard won’t offer adequate protection.
- Check Fasteners Often: Because they can loosen over time with vibration and impact, it’s a good habit to check the tightness of the screws or clips holding your throat guard before each game or practice. A quick wiggle test can save you a lot of trouble.
- Avoid Harsh Chemicals: Do not use abrasive cleaners, solvents, or petroleum-based products on your throat guard, as they can break down the plastic and compromise its integrity.
- Proper Storage: Store your catcher’s gear in a cool, dry place. Avoid leaving it in direct sunlight or extreme heat (like a car trunk on a hot day) for extended periods, as this can warp or weaken the materials.
Following these simple maintenance tips will help extend the lifespan of your Under Armour gear and, more importantly, ensure your safety.
Understanding Catcher’s Gear Standards and Your Throat Guard
It’s worth noting that while a properly fitted throat guard is essential, the head and throat protection system as a whole is subject to various standards. In youth baseball, organizations like Little League and USA Baseball have specific rules regarding mandatory equipment for catchers, including helmets and throat guards. For example, USA Baseball recommends that all catcher’s helmets and masks feature a designated throat protector. Many organizations adhere to standards set by organizations like ASTM International, which develops product safety standards. While Under Armour products are designed to meet competitive standards, understanding that your throat guard is part of a larger safety system is always a good reminder.
According to the Little League Equipment Rules, while specific models aren’t mandated, the requirement for protective equipment is clear. Similarly, USA Baseball emphasizes safety and best practices in its guidelines. Ensuring your throat guard is securely attached and correctly positioned is your responsibility to meet these implicit and explicit safety requirements.
Frequently Asked Questions (FAQs) about Under Armour Catchers Throat Guards
1. How do I know if my Under Armour throat guard is fitted correctly?
A correctly fitted throat guard should feel snug against your helmet cage, with no significant wobble or looseness. When you wear the helmet, the guard should comfortably cover the soft part of your throat without digging into your chin or neck. You should also have a clear field of vision and be able to breathe and speak without restriction.
2. What if my Under Armour throat guard didn’t come with screws?
Some Under Armour throat guards might use a clip-on or snap-fit system that doesn’t require screws. If yours is designed for screws and none were included, check the product packaging again. If still missing, contact the retailer or Under Armour customer service to obtain the correct fasteners. Using the wrong type of screw can damage your gear.
3. Can I use a throat guard from a different brand with my Under Armour catcher’s helmet?
While it might be possible, it’s generally best to use an Under Armour throat guard with an Under Armour helmet, or a guard specifically designed to be compatible. Helmet cage designs can vary, and a mismatched guard might not fit securely or offer optimal protection. Always check compatibility guidelines if mixing brands.
4. How often should I replace my throat guard?
You should replace your throat guard if it shows any signs of damage, such as cracks, deep gouges, or deformation. Aside from damage, many manufacturers recommend inspecting gear annually, and replacing it every few years, especially if it’s used frequently, as materials can degrade over time.
5. My throat guard makes it hard to talk. What can I do?
This usually indicates it’s positioned too high or is too large for your face. Try slightly loosening the screws and adjusting the guard lower on the cage. Ensure it’s not pushing up against your chin or jawline. If it’s still an issue, the guard’s shape or size might not be the best match for your helmet and facial structure. Consult Under Armour’s sizing guides or consider a different model.
6. What is the best way to clean my Under Armour throat guard?
The best way to clean your throat guard is with mild soap and water. Use a soft cloth or sponge, rinse thoroughly, and then let it air dry completely. Avoid harsh chemicals, solvents, or abrasive cleaners, as these can damage the plastic and reduce its protective capabilities.
Conclusion
Getting the right fit for your Under Armour catcher’s throat guard is a critical step in ensuring your safety and comfort behind home plate. By following these detailed steps – from inspecting the components and attending to the fastener details to performing a thorough fit test – you can achieve a secure, reliable connection between the guard and your helmet. Remember that proper fit prevents distractions, maximizes protection against foul tips and wild pitches, and allows.
